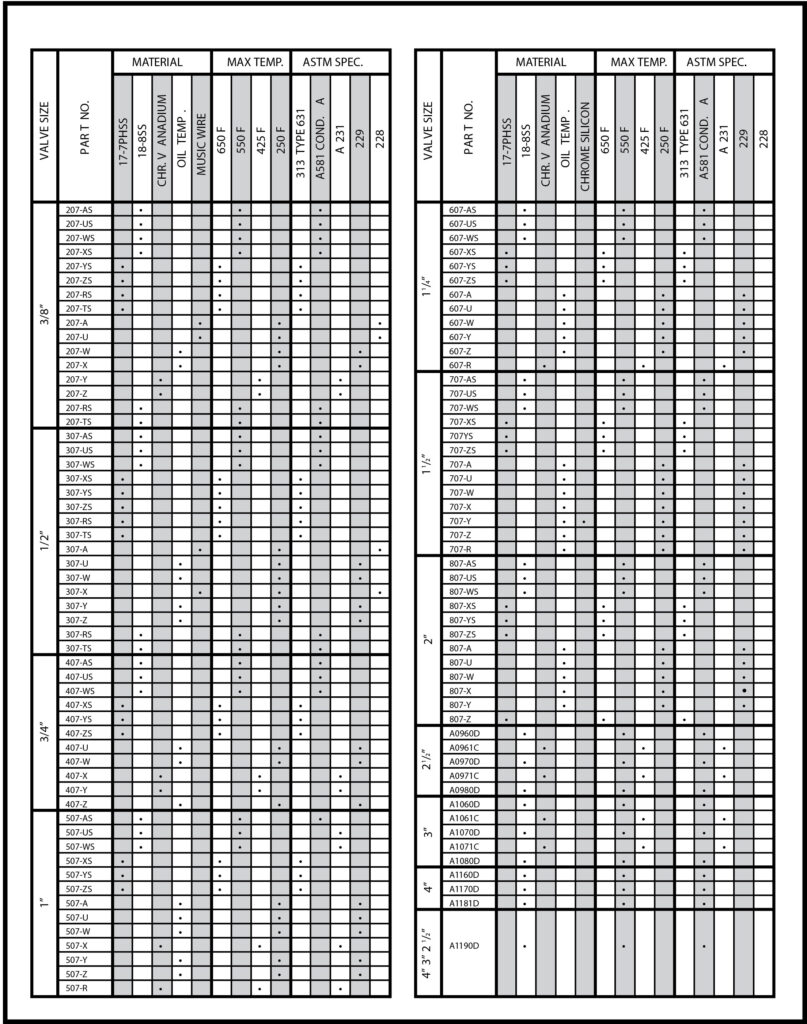
Engineering Data
VALVE SIZING-Use of Performance Charts
The trademark Fulflo expresses the basic principle that the relief valve must have flow capacity equal to that of the pipelines to which it is connected. The sliding piston concept and internal design contours of Fulflo valves provide unique flow and stability characteristics for reliable performance without chatter.
Fulflo valves are designed to operate reliably at pressures as low as 2 psi and as high as 1000 psi. The Fulflo valve reduces velocities through all but the controlling interface of the valve, thereby minimizing system power loss.
Read More
Unlike ordinary direct-acting relief valves, Fulflo guided piston valves are less responsive to transient pressure surges, thereby eliminating the tendency to pound, squeal, or chatter. Quiet, stable, efficient performance is assured in both load regulation and system protection applications.
Fulflo valves operate effectively with all types of liquids in the full range of viscosities including hydraulic oils, water, solvents, and chemicals.
Fulflo valves are not designed to be positive shut off valves and will pass a minimal amount of leakage before the set pressure.
Fulflo valves are not designed for use with air, gas, or steam.
Since the Fulflo relief valve is a flow-modulating device, pressure-flow characteristics are completely different from spring-loaded poppet or ball check valves.
Both types remain substantially tight up to cracking pressure. When this pressure is exceeded, the “conventional” valve pops open with a pressure drop at very low flow and an exponential pressure rise as the flow increases.
In contrast, the Fulflo valve causes a pressure rise, over-pressure, as soon as flow starts; pressure increases almost proportionally with the flow. Fulflo valves are carefully designed to minimize this over-pressure.
Both pressures are important in sizing a valve. Cracking pressure must be selected high enough to permit system operation at its maximum rated pressure and flow. Over-pressure is limited by the system’s capability to withstand the additional pressure and the motor’s ability to sustain the pump output at the increased pressure for the required time interval.
The over-pressure to produce a certain flow is a function of valve size and spring constant, and can be determined with the aid of the performance charts given for the different valve sizes. The valve performance charts are based on tests made with oil of 150 SSU viscosity at 100˚F and may be used with reasonable accuracy within the conventional range of oil viscosities from 30 to 500 SSU. For operation with high viscosity fluids, consult Fulflo’s engineering department.
In sizing a valve, the first attempt should be to select a valve equal in size to the pipe to which it is connected. A larger or smaller valve may be used to suit individual requirements, depending on the permissible amount of over-pressure. Assume we have selected a 3/4” valve for 17 gpm, flow and a cracking pressure of 325 psi. By referring to the valve’s spring pressure range chart, we find that we may use either a “YS” or a “ZS” spring.
Assuming a “YS” spring, draw a line horizontally at 17 gpm in the 3/4” valve chart, to intersect the slanted line marked “YS” and drop a vertical line to the over-pressure scale to read an over-pressure of 44 psi. The 17 gpm will be discharged at a pressure of 325 + 44, or 369, psi. The percentage of over-pressure would be 44/325 x 100, or 13.5%.
If a “ZS” spring is used, extend the horizontal line to the “ZS” slope and the over-pressure is 70 psi. The pressure to pass 17 gpm would be 325 + 70, or 395, psi and the over-pressure would be 21.5%. If the over-pressure is higher than desired for the particular application, the procedure may be repeated for the next larger size valve.
In some cases, maximum flow through a valve at a given pressure is specified. To determine the cracking pressure, assume a 3/4” valve is to pass 12 gpm at 50 psi. A horizontal line drawn from the 12 gpm capacity to the intersection with the “WS” spring line results in an over-pressure of 14 psi, therefore the cracking pressure must be 50 – 14, or 36, psi, and the percentage of over-pressure of only 9 psi, but the cracking pressure would be 14/36 x 100, or 38.8%. The use of a “US” spring would produce an over-pressure of only 9 psi, but the cracking pressure would then be 50 – 9, or 41, psi, which would exceed the rating of the “US” spring.
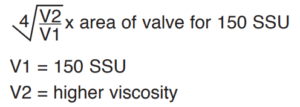
For sizing valves for higher viscosity than 500 SSU, the following formula is used:
Assume we have the following application,
gpm = 10
Viscosity = 12,000 SSU
Normally for 10 gpm flow a 1/2” valve would be used.
The orifice area chart below gives the area of a 1/2” valve as .305.
2.99 x .305=.9120 area needed to pass 10 gpm. Again referring to the orifice area chart, we find that the area of the 11/4” valve is 1.224. Therefore a 11/4” valve would be used. To find the over-pressure, refer to the performance chart for a 11/4” valve.
Performance charts based on actual test results are available on request. For additional information contact Fulflo’s engineering department.
PIPE SIZING-Use of the Nomograph
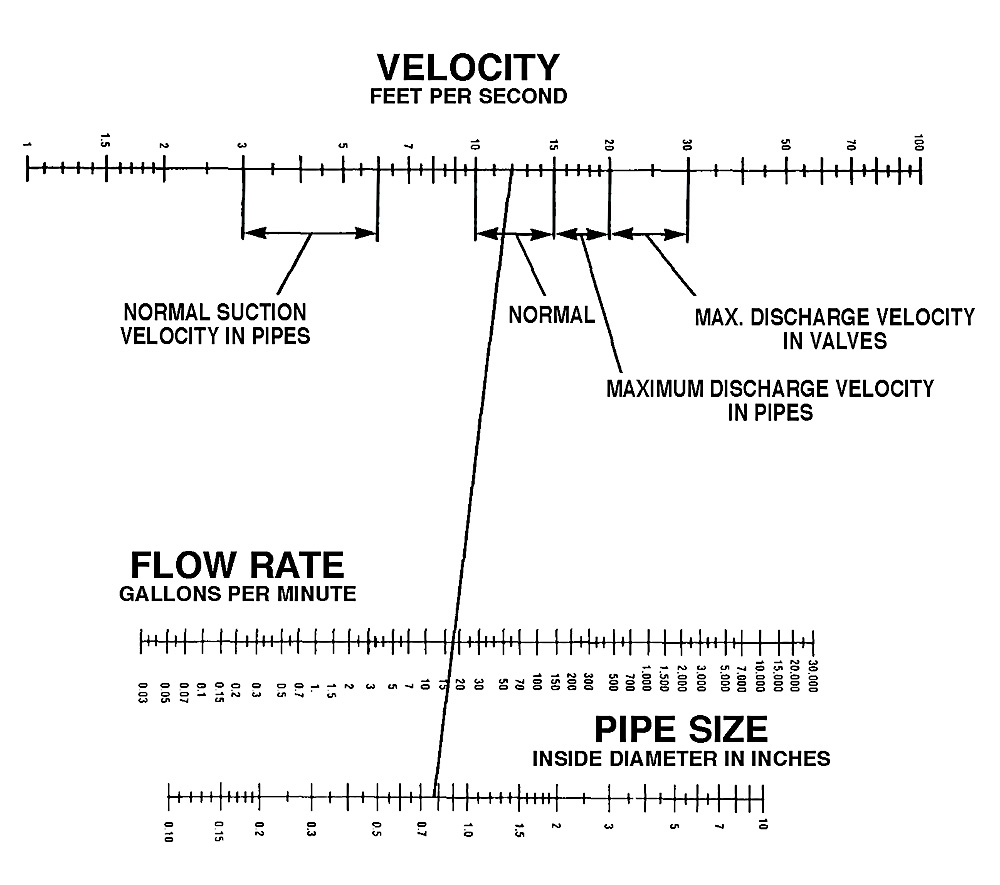
The flow velocity, which must first be determined, is dependent on the viscosity of the fluid and the permissible flow resistance in the piping. Lower velocities are for higher viscosity fluids and/or lower pressure drops; higher velocities are for less viscous fluids and cases where higher pressure drops can be tolerated. In all cases, allowable suction velocities are much lower and the lowest velocities should be used for the more viscous fluids and/or higher suction lifts.
Read More
Suction velocities are much more critical than discharge velocities. Too high a discharge velocity may only result in excessive power loss but an excessive suction velocity may cause damage to the pump and system, and render the system inoperable.
After the velocity has been selected, the nomograph chart is used to determine the inside diameter of the pipe at a given flow rate. For example, assume a flow of 17 gpm and a velocity of 12 fps for the discharge pipe is required. Draw a line from the 12 fps point on the velocity scale through the 17 gpm point on the flow rate scale and the extended line intersects the pipe inside diameter scale at 0.76 inches. This inside diameter applies to either pipe or tubing.
The correct pipe or tube size also depends on the pressure it must carry. The conversion chart for pipe sizes and schedules facilitates this section.
Note the different weights or piping are grouped under various schedule numbers. Approximate pressure for each schedule number may be computed from the formula.
Pressure = S is the permissible stress to which the pipe is subjected. Thus, for a stress of 10,000 psi, the allowable pressure is equal to ten times the schedule number. Higher pressures may be carried if higher stresses are allowed.
In the example, a schedule 40 pipe is more than adequate for 250 psi. Twice the wall thickness of a 3/4” schedule 40 pipe of 0.226 or 0.976”. Since the actual outside diameter of a 3/4” schedule 40 pipe is 1.05”, the selection of a 3/4” pipe is adequate.
A 3/4” Fulflo relief valve should be selected. Operational characteristics of this valve, that is cracking pressure and overpressure, may be determined from the performance chart precisely in the manner explained in the example. The maximum discharge pressure of 285 psi is still well below the safe carrying capacity of the pipe. The design of the Fulflo valves is such that if used within their rating and with properly selected springs, the overpressure is not sufficient to endanger system or system components.
SAE O-RING BOSS CONNECTIONS
| Valve Size | SAE J1926 | ||||||||
| 5 | 6 | 8 | 10 | 12 | 16 | 20 | 24 | 32 | |
| 3/8” | X | X | X | ||||||
| 1/2” | X | X | X | ||||||
| 3/4” | X | ||||||||
| 1” | X | X | X | ||||||
| 1 1/4” | X | X | |||||||
| 11/2” | X | ||||||||
| 2” | X | ||||||||
SAE (Society Automotive Engineers)
Dimension (Inches)
| SAE NO. | A | B | C | D | E |
| 5 | 1/2”-20 | .937 | .547 | .550 | 12˚ |
| 6 | 9/16”-18 | 1.000 | .609 | .616 | 12˚ |
| 8 | 3/4”-16 | 1.218 | .688 | .811 | 12˚ |
| 10 | 7/8”-14 | 1.375 | .781 | .942 | 15˚ |
| 12 | 11/16”-12 | 1.656 | .906 | 1.148 | 15˚ |
| 16 | 15/16”-12 | 2.000 | .906 | 1.398 | 15˚ |
| 20 | 15/8”-12 | 2.312 | .906 | 1.713 | 15˚ |
| 24 | 17/8”-12 | 2.562 | .906 | 1.962 | 15˚ |
| 32 | 21/2”-12 | 3.192 | .906 | 2.587 | 15˚ |
| Valve Size | SAE No. | Material | |||
| Cast Iron | Brass | Steel | Stainless Steel | ||
| 3/8” | 5 | SVJ-2039 | SVB-2039 | SVS-2039 | SVSS-2039 |
| 6 | SVJ-2036 | SVB-2036 | SVS-2036 | SVSS-2036 | |
| 8 | SVJ-2042 | SVB-2042 | SVS-2042 | SVSS-2042 | |
| 1/2” | 6 | SVJ-3065 | SVB-3065 | SVS-3065 | SVSS-3065 |
| 8 | SVJ-3066 | SVB-3066 | SVS-3066 | SVSS-3066 | |
| 10 | SVJ-3051 | SVB-3051 | SVS-3051 | SVSS-3051 | |
| 3/4” | 12 | SVJ-4049 | SVB-4049 | SVS-4049 | SVSS-4049 |
| 1” | 12 | SVJ-5084 | SVB-5084 | SVS-5084 | SVSS-5084 |
| 16 | SVJ-5071 | SVB-5071 | SVS-5071 | SVSS-5071 | |
| 20 | SVJ-5083 | SVB-5083 | SVS-5083 | SVSS-5083 | |
| 11/4“ | 20 | SVJ-6065 | SVB-6065 | SVS-6065 | SVSS-6065 |
| 24 | SVJ-6066 | SVB-6066 | SVS-6066 | SVSS-6066 | |
| 11/2“ | 24 | SVJ-7050 | SVB-7050 | SVS-7050 | SVSS-7050 |
| 2” | 32 | SVJ-8047 | SVB-8047 | SVS-8047 | SVSS-8047 |
SOCKET WELD & STANDARD MATERIALS
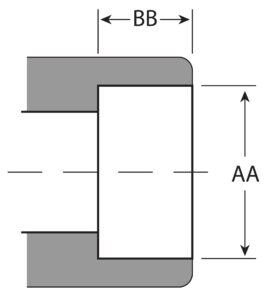
Socket Weld
| Valve Size | Model Number | AA | BB | ||
| Steel | Stainless Steel | Min. | Max | ||
| 3/8” | SVS-2033 | SVSS-2033 | .685 | .690 | .312 |
| 1/2” | SVS-3037 | SVSS-3037 | .850 | .855 | .437 |
| 3/4” | SVS-4038 | SVSS-4038 | 1.060 | 1.065 | .562 |
| 1” | SVS-5024 | SVSS-5024 | 1.325 | 1.330 | .625 |
| 11/4“ | SVS-6058 | SVSS-6058 | 1.670 | 1.675 | .750 |
| 11/2“ | SVS-7067 | SVSS-7067 | 1.910 | 1.915 | .812 |
| 2“ | SVS-8070 | SVSS-8070 | 2.410 | 2.415 | .875 |
ASTM/ASME SPECIFICATIONS (Materials Subject to Change)
Adjusting Screws, Stop Rings, Glands, Bonnets
Brass – ASTM B16
Steel – ASTM 108
Stainless Steel – ASME SA479 (Stop Rings Only Class 316)
Pistons
Hardened Steel – ASTM 108
416 – SS – ASTM A 582 Cond. A, ASTM A484
303 – SS – ASTM A 582 Class 303, ASTM A484
Locknuts & Retainers
Steel – ASTM 108
Stainless Steel – ASTM A582 Class 303, ASTM A484 Class 303
Brass – ASTM B16
Caps
Cast Iron – 401 thru 801 ASTM A 48 Class 30
Brass – 201-B thru 501-B ASTM B16
Brass – 601B thru 801-B ASME B62
Steel – ASTM 108, ASTM A216 WCB
Stainless Steel – ASTM A484, ASTM A351 CF8
Bodies
Cast Iron – ASTM A126-42 Class A
Brass – ASME B62
Steel – ASTM A 216 Grade WCB
Stainless Steel – ASTM A 351 CF8M, ASTM A 743 CF8
O-RING & PAD MATERIAL SPECIFICATIONS
| Material | Suffix Code | Compound | Temp. Range | ASTM Spec. | |
| Min. | Max | ||||
| Buna | R | B 46 | -40˚F | 257˚F | D2000 |
| Ethylene-Propylene | EPR | E 50 | -67˚F | 302˚F | D2000 |
| Viton | RV | V 14 | -31˚F | 437˚F | D2000 |
| Silicone | RS | S 71 | -103˚F | 482˚F | D2000 |
| Teflon | RT | – – | -423˚F | 500˚F | D2000 |
| Neoprene | RN | – – | -67˚F | 284˚F | D2000 |
| Aflas | RA | – – | -25˚F | 450˚F | D2000 |
Maximum Allowable Working Pressure
| Cast Iron | 1500 psi |
| Brass | 1500 psi |
| Steel | 2000 psi |
| Stainless Steel | 2000 psi |
Max / Min Temp. of Bodies
| Material | Min. Temp. | Max Temp. |
| Cast Iron | -20˚F | 400˚F |
| Brass | -20˚F | 400˚F |
| Steel | -30˚F | 600˚F |
| Stainless Steel | -50˚F | 600˚F |
ORIFICE AREA & PISTON/BODY TOLERANCES
| Valve Size | Piston Dia. +.000-.0003 | Area In 2 | Body Go RC 3 Fit | Body No Go RC 3 Fit |
| 3/8″ | .4985 | .195 | .4993 | .4999 |
| 1/2″ | .6235 | .305 | .6243 | .6249 |
| 3/4″ | .7485 | .440 | .7493 | .7499 |
| 1″ | .9985 | .783 | .9993 | 1.0003 |
| 11/4“ | 1.2485 | 1.224 | 1.2495 | 1.2507 |
| 11/2“ | 1.4985 | 1.764 | 1.4995 | 1.5007 |
| 2″ | 1.9985 | 3.167 | 1.9997 | 2.0011 |
| 21/2“ | 2.6500 | 5.515 | 2.6517 | 2.6527 |
| 3″ | 3.1235 | 7.663 | 3.1247 | 3.1261 |
| 4″ | 4.1222 | 13.346 | 4.1250 | 4.1262 |
FLANGE AND DRILLING DIMENSIONS (INCHES)
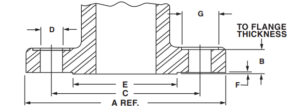
Class 125 (Cast Iron), Class 150 (Brass, Steel, Stainless Steel)
| Valve Size | Flange Diameter | Flange Thickness | C Bolt Circle Diameter | D Bolt Holes Diameter | Raised Face Diameter | F Raised Face Height | G Spotface Diameter | Number of Bolts | |
| Brass | Cl/Steel | ||||||||
| 1” | 41/4“ | 3/8” | 9/16” | 31/8“ | 5/8” | 2” | 1/16” | 1.12 | 4 |
| 11/4″ | 45/8″ | 13/32” | 5/8” | 31/2“ | 5/8” | 21/2“ | 1/16” | 1.12 | 4 |
| 11/2″ | 5″ | 7/16” | 11/16” | 37/8“ | 5/8” | 27/8“ | 1/16” | 1.12 | 4 |
| 2” | 6″ | 1/2” | 3/4” | 43/4“ | 3/4” | 35/8“ | 1/16” | 1.37 | 4 |
| 21/2″* | 7” | N/A | 7/8” | 51/2“ | 3/4” | 41/8“ | 1/16” | 1.37 | 4 |
| 3”* | 71/2″ | N/A | 15/16” | 6” | 3/4” | 5” | 1/16” | 1.37 | 4 |
| 4”* | 9” | N/A | 15/16” | 71/2“ | 3/4” | 63/16“ | 1/16” | 1.37 | 8 |
Note: Brass flanges conform to 150# ANSI B 16.24 except with raised face. Cast Iron and Steel flanges conform to 150# ASME B 16.5 steel specifications.
*Available in Cast Iron & Steel only. 125-250 AARH flange finish (Steel & Stainless Steel only)
Class 250 (Cast Iron)
| Valve Size | A Flange Diameter | B Flange Thickness | C Bolt Circle Diameter | D Bolt Holes Diameter | E Raised Face Diameter | F Raised Face Height | G Spotface Diameter | Number of Bolts |
| 1” | 47/8″ | 11/16” | 31/2″ | 3/4” | 2 11/16″ | 1/16” | 1.37 | 4 |
| 11/4″ | 51/4″ | 3/4” | 37/8″ | 3/4” | 31/16″ | 1/16” | 1.37 | 4 |
| 11/2″ | 61/8″ | 13/16” | 41/2″ | 7/8” | 39/16″ | 1/16” | 1.56 | 4 |
| 2″ | 61/2″ | 7/8” | 5 | 3/4” | 43/16″ | 1/16” | 1.37 | 8 |
Note: Cast Iron flanges conform to 250 # ASME B 16.2 steel specifications.
Class 300 (Brass, Steel, Stainless Steel)
| Valve Size | A Flange Diameter |
B Flange Thickness |
C Bolt Circle Diameter |
D Bolt Holes Diameter |
E Raised Face Diameter |
F Raised Face Height |
G Spotface Diameter |
Number of Bolts |
| 1” | 47 /8” | 11/16” | 31 /2” | 3/4” | 2” | 1/16” | 1.37 | 4 |
| 11 /4” | 51 /4” | 3/4” | 37 /8” | 3/4” | 21 /2” | 1/16” | 1.37 | 4 |
| 11 /2” | 61 /8” | 13/16” | 41 /2” | 7/8” | 27 /8” | 1/16” | 1.56 | 4 |
| 2” | 61 /2” | 7/8” | 5” | 3/4” | 35 /8” | 1/16” | 1.37 | 8 |
| 21 /2” | 71 /2” | 1” | 57 /8” | 7/8” | 41 /8” | 1/16” | 1.56 | 8 |
| 3” | 81 /4” | 11 /8” | 65 /8” | 7/8” | 5” | 1/16” | 1.56 | 8 |
| 4” | 10” | 11 /4” | 77 /8” | 7/8” | 63 /16” | 1/16” | 1.56 | 8 |
Note: Available in Steel and Cast Iron only. Brass flanges conform to 300# ANSI B 16.24 except with raised face.
Steel flanges conform to 300# ASME B 16.5 steel specifications. 125-250 AARH flange finish (Steel & Stainless Steel only)
Class 600 (Steel, Stainless Steel)
| Valve Size | A Flange Diameter |
B Flange Thickness |
C Bolt Circle Diameter |
D Bolt Holes Diameter |
E Raised Face Diameter |
F Raised Face Height |
G Spotface Diameter |
Number of Bolts |
| 1” | 47 /8” | 15/16” | 31 /2” | 3/4” | 2” | 1/4” | 1.37 | 4 |
| 11 /4” | 51 /4” | 11 /16” | 37 /8” | 3/4” | 21 /2” | 1/4” | 1.37 | 4 |
| 11 /2” | 61 /8” | 11 /8” | 41 /2” | 7/8” | 27 /8” | 1/4” | 1.56 | 4 |
| 2” | 61 /2” | 11 /4” | 5” | 3/4” | 35 /8” | 1/4” | 1.37 | 8 |
| 21 /2” | 71 /2” | 13 /8” | 57 /8” | 7/8” | 41 /8” | 1/4” | 1.56 | 8 |
| 3” | 81 /4” | 11 /2” | 65 /8” | 7/8” | 5” | 1/4” | 1.56 | 8 |
| 4” | 103 /4” | 13 /4” | 81 /2” | 1” | 63 /16” | 1/4” | 1.78 | 8 |
Note: Steel flanges conform to 600 # ASME B 16.5 steel specifications. 125-250 AARH flange finish (Steel & Stainless Steel only)
Note: Special Flanges With Drilling On Or Off Center And Smooth Or Raised Face Are Available Upon Request
